Tutorial 01
How to Work with
a Standard Body
Measurements Chart
A standard body measurements chart gives you the starting point for fit.
Before you build a block, develop a pattern, grade a size range, or create a customer size chart, you need one agreed measurement base.
Written for clothing brands first, with practical notes for designers, pattern makers, home sewists, and trainers.
In this tutorial
- What the chart is used for
- The three garment foundations
- Choosing your base size
- Reading the A to X positions
- Building the basic block
- Testing and approving the block
- Developing patterns from the block
- Testing and approving the pattern
- Grading the approved pattern
- Creating your size specification
This tutorial explains the method. Use it to understand how the chart supports blocks, patterns, grading, and size specification work.
The chart is the first reference.
A standard body measurements chart does not stand alone. It feeds the tools that come after it.
When the measurement base is clear, the block, pattern, grading, size specification, and customer size chart can all trace back to the same starting point.
The chart gives the body measurement base. The approved block guides fit. The approved pattern feeds grading and size specification.
Understand what the chart is used for.
A standard body measurements chart gives a brand one agreed body measurement base before blocks, patterns, grading, or customer size tools are developed.
It is an internal technical reference. A customer size chart comes later.
Use the chart as the first control point in your fit development process.
Know the three garment foundations.
Every garment decision sits on three foundations: the body measurements, the fabric, and the making method.
The standard body measurements chart gives you the measurement foundation. It defines the body base before the block, pattern, grading, and size specification are developed.
The fabric then shapes how that base performs. Stretch, drape, weight, recovery, and stability all affect how the garment sits, moves, and returns after wear.
The making method turns the design into the final garment. Cutting, sewing, pressing, seam choice, construction, and finishing decide whether the fit standard holds in the finished product.
Choose the right base size.
Before building the block, choose the size you can fit on consistently during sampling.
For a clothing brand, this may be the size of your fit dummy, house model, fit model, or runway model.
For a designer or home sewist working with individual clients, choose a starting size that lets you check fit regularly before adjusting to the customer’s own measurements.
Once the base size is chosen, keep it consistent through the block, fitting, pattern development, grading, and size specification.
Read the measurement positions clearly.
Before using the chart, understand where each measurement position sits on the body.
The A to X positions help you connect the body measurement, the block, and the fitting process.
This keeps the measuring method consistent before you move into block building, pattern development, testing, correction, and grading.
See where the positions sit on the body.
These positions help you read the chart correctly before building the first block. The letters identify where each measurement is taken on the body.
This illustration shows positions only, not measurement values.
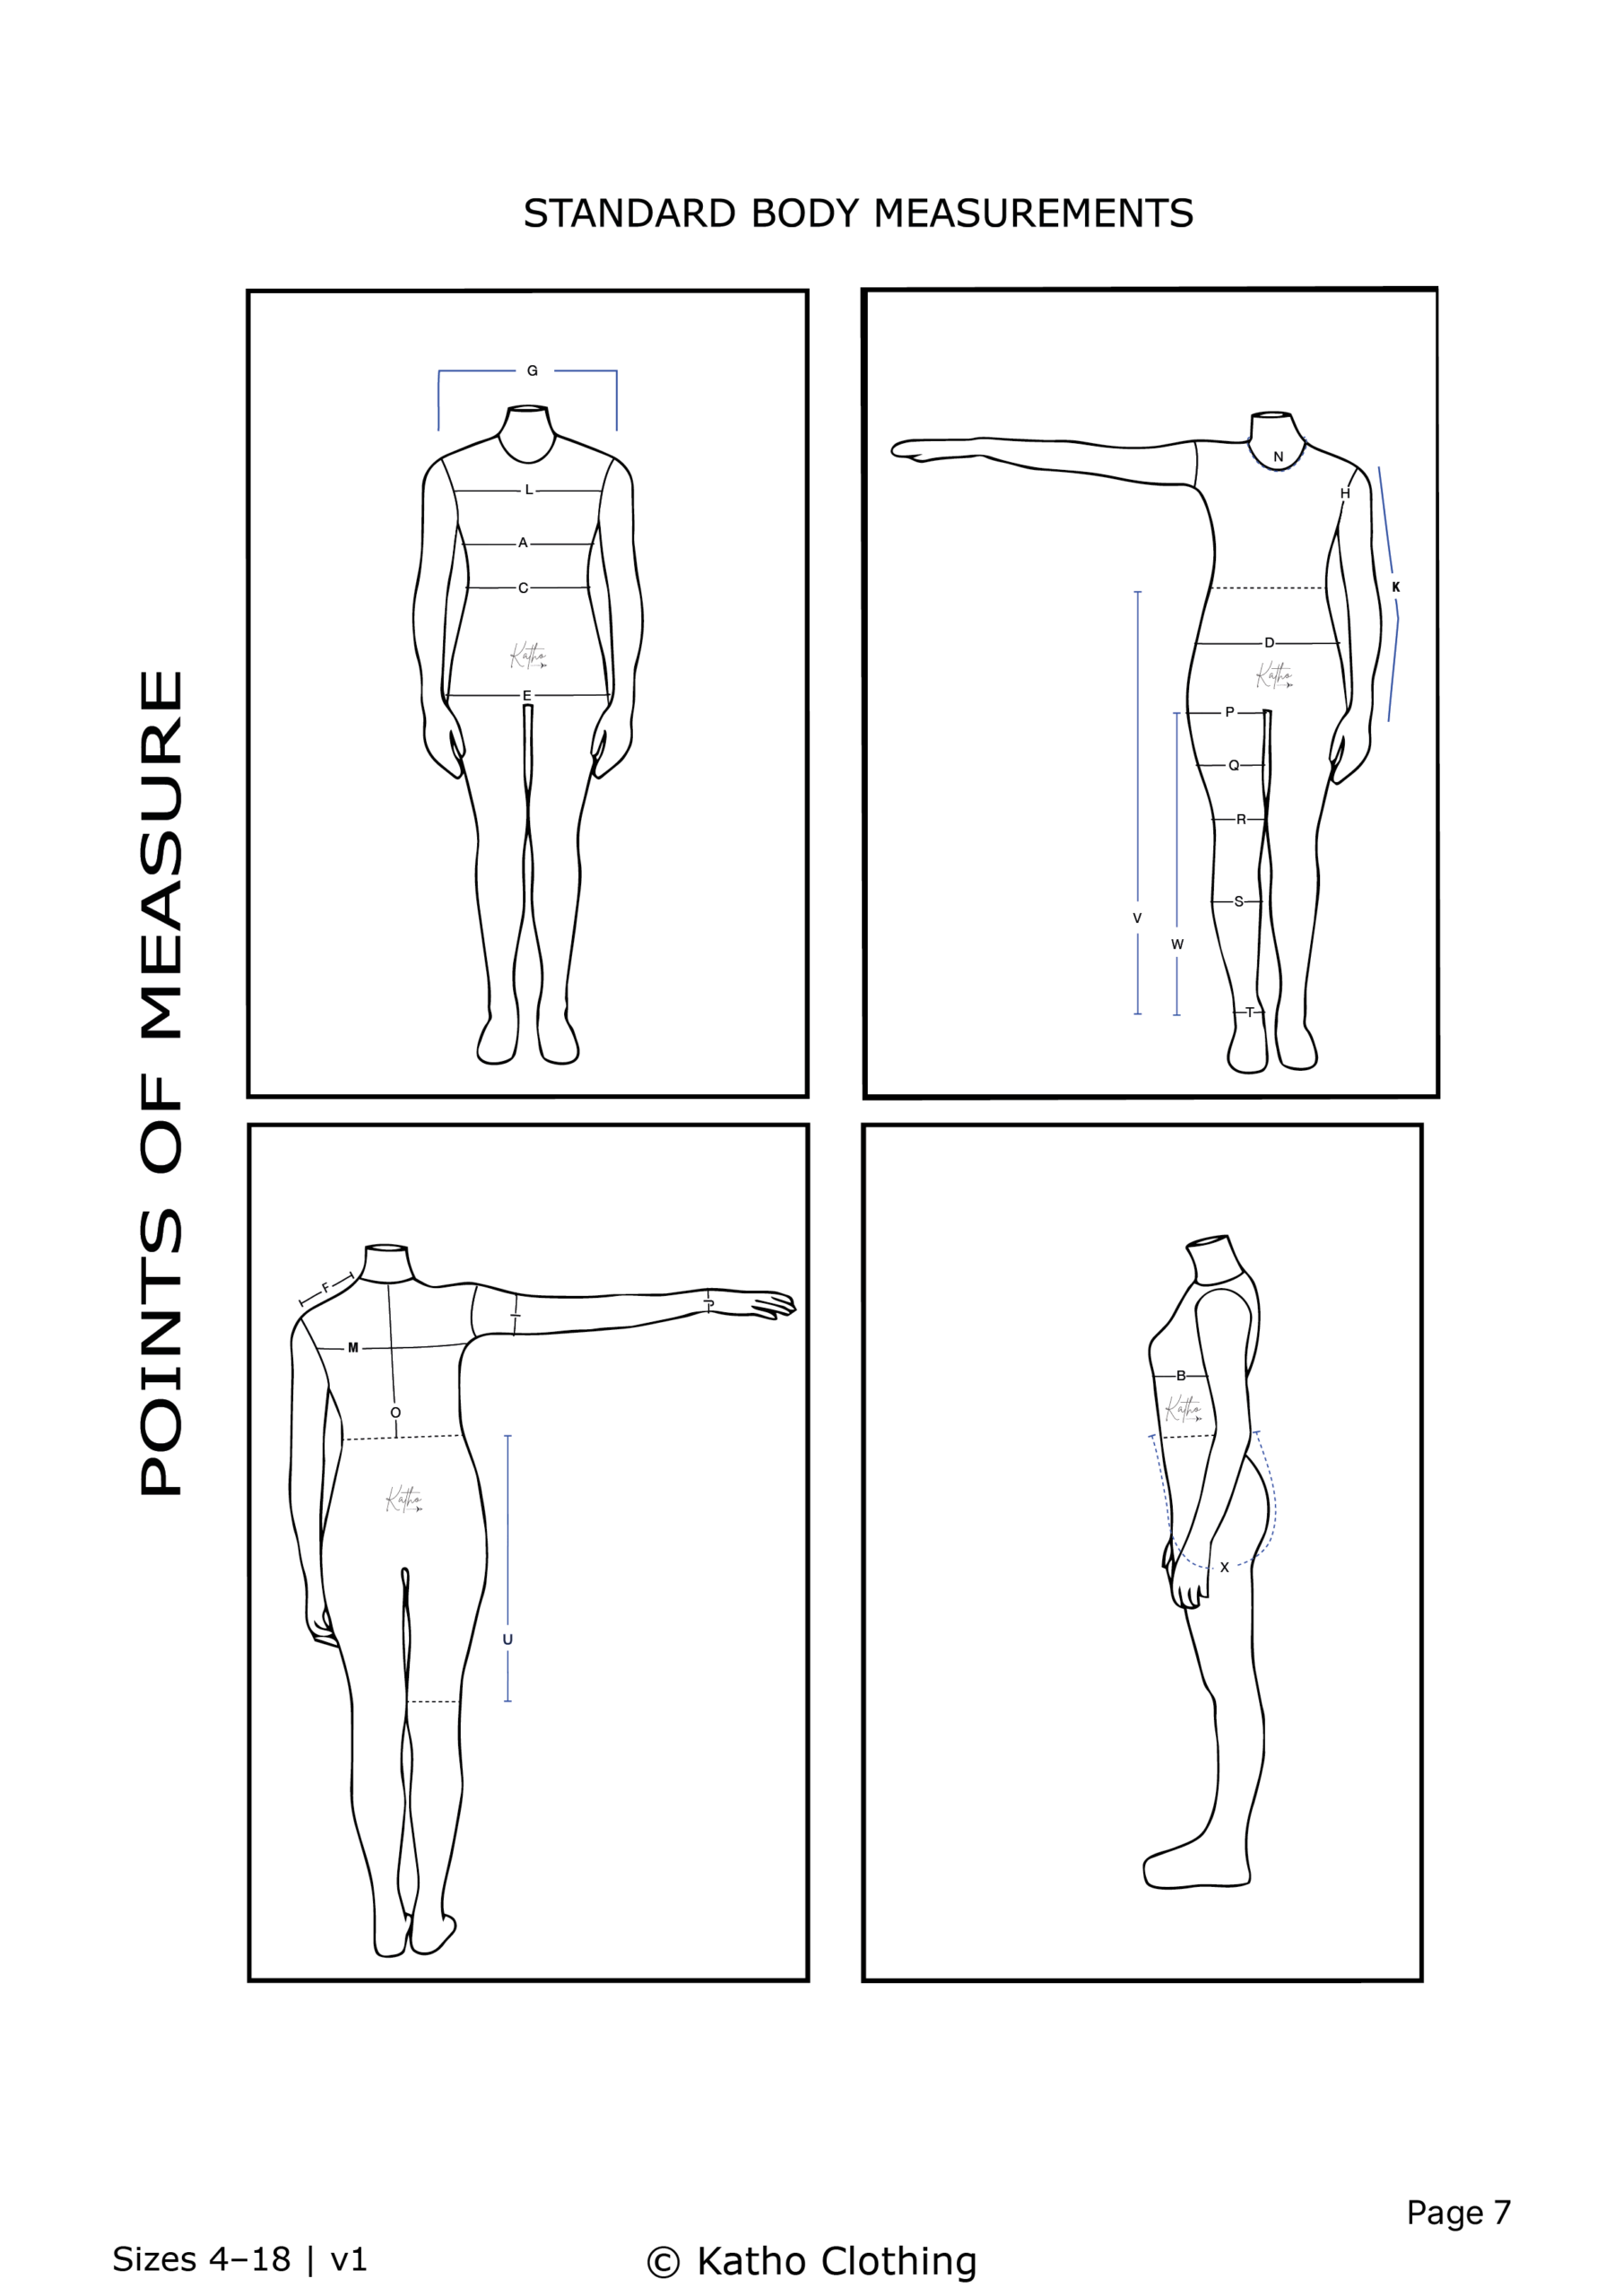
Use the letters as position guides.
Start with the positions first. Then select the measurements needed to build the block.
Build the basic block from the chart.
Once you understand the measurement positions, use the chart to build the basic block.
The chart gives the body measurement base. The block turns those measurements into a working fit shape.
At this stage, you are not creating the final style pattern. You are building the first fit foundation.
The block must still be tested and approved before it can guide future pattern development.
Test and approve the block.
After building the basic block, test it before using it to develop style patterns.
Check the block on a body, dummy, or fitting model so you can see how the measurement base works in fit.
Review balance, shoulder position, armhole depth, waist position, hip position, length, ease, and movement.
Once the corrections are made and the fit is approved, the block becomes the foundation for pattern development.
Develop the pattern from the block.
Once the block has been tested and approved, use it as the starting point for pattern development.
The block gives you the fit foundation. The pattern adds the style details, garment shape, seams, openings, design lines, and construction choices.
This is where the design becomes a real garment pattern, but it still needs to be sampled and checked before grading.
Keep the pattern connected to the approved block so the style does not lose the fit standard you already tested.
Test, fit, and approve the pattern.
After the style pattern has been developed from the approved block, make a sample or toile to test the actual garment.
This stage checks how the design, fabric, construction method, seam placement, ease, and proportions work together.
Adjust the pattern where needed, then test again until the garment reaches the approved fit and style standard.
Only grade the pattern after the sample has been checked, corrected, and approved.
Grade the approved pattern.
Once the style pattern has been sampled, fitted, corrected, and approved, it can be graded into the full size range.
The approved pattern carries the garment style. The approved block carries the fit standard. The chart keeps the size logic connected to the original measurement base.
Use the chart and grading rules to guide how key areas grow across sizes, including bust, waist, hip, shoulder, armhole, sleeve, length, and overall balance.
This keeps the graded pattern range linked to the approved fit, the approved style pattern, and the measurement base chosen at the start.
Create your size specification.
After the approved pattern has been graded, create the size specification for that style and its full size range.
The size specification records the finished garment measurements, key points of measure, grading points, tolerance rules, and fit requirements for the style.
This document becomes the tested and approved reference for that specific style. Designers, pattern makers, sample rooms, suppliers, and production teams can all work from the same confirmed standard.
When the style is produced again, the size specification gives everyone the same reference point.
This is how fit consistency is created and banked. The approved information moves from one person’s judgement into a controlled document that can be used again and again.
The chart gives the body measurement base. The block builds the fit foundation. The approved pattern creates the style. Grading extends that style across sizes. The size specification then becomes the future reference for production, recreating the style, checking and final inspections.
Use the chart differently depending on your role.
The same measurement base can support different decisions. Use it as a technical starting point, then apply it to the work you need to control.
For clothing brands
Use the chart to agree on one measurement base before briefing pattern makers, suppliers, sample rooms, or production teams.
For designers
Use the chart before sketching into size ranges. It helps you design with fit, proportion, and customer body shape in mind.
For pattern makers
Use the chart to choose the base size, draft the first block, check key body positions, and control grading decisions.
For home sewists
Use the chart as an organised starting point before adjusting for each customer’s personal measurements and fit needs.
For trainers
Use the chart to teach measurement logic, body positions, block development, grading, and the link between fit tools.
Avoid breaking the technical chain.
Treating the body measurements chart as a size specification.
Use it as the measurement base. Build the size specification later from approved fit work.
Moving into pattern development before the block has been tested and approved.
Test the block first. Then use the approved block as the foundation for style patterns.
Grading before the style pattern has been sampled, fitted, corrected, and approved.
Grade the approved pattern, with the chart and block still guiding the size logic.
Changing the measurement base every time a fit issue appears.
First check the block, pattern, fabric, construction method, and fit intention before changing the base.
Creating a size specification from unapproved measurements.
Create the size specification after the style has been tested, approved, graded, and controlled.
Avoid building your fit around an unreliable chart.
Before you choose a measurement base, check that the chart supports your market, fitting method, product type, and technical process.
Random online charts can create problems because they may not match your market, your fitting method, your product type, or the body profile you work with most often.
The risk grows when that chart feeds your block, patterns, grading, size specification, and customer size chart.
Start with a clear measurement base, test it through the block and pattern, then carry the approved standard into your size specification.
Work from one measurement base.
The Women’s Standard Body Measurements Chart is available for brands, pattern makers, home sewists, and trainers.